What's new in version 1.07 of our PC-BEAMAGE software?
Thursday, May 19, 2022
Thursday, May 19, 2022
A new version of our PC-BEAMAGE software was just released! V1.07.00 includes many changes and improvements, especially in regards to M2 measurement. You can download this latest update on our website here.
Here’s what you need to know about PC-BEAMAGE V1.07.00.
The most notable changes in V1.07.00 pertain to the M2 measurement part of the software. The improvements are two-fold:
First, the maths behind the M2 measurement. We have drastically improved the code of the hyperbolic interpolation which draws the beam caustic, the latter being the backbone on how the M2 value itself is calculated. We’ll spare you the fine details, but what it means in practical terms is that your M2 measurements will be much more accurate and repeatability will also be much improved. More specifically, for beams with a M2 value close to 1, the software will now be much more unlikely to return a measurement that would be below 1, which, as we know, is impossible in the real world, but which was still “theoretically” possible because of how M2 measurements come with an uncertainty of ±5%. The bottom line is that you will get much fewer unpleasant surprises on this front.
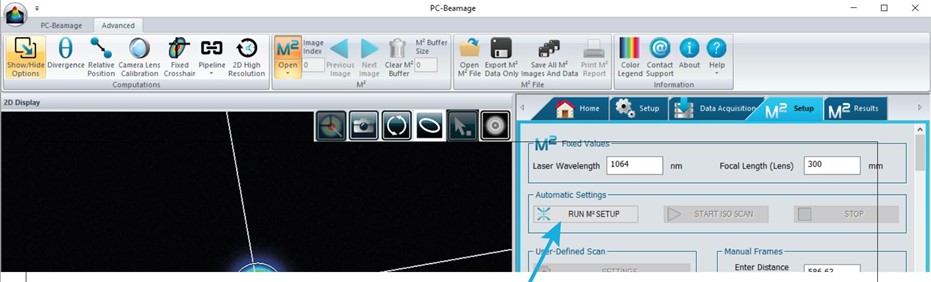
Second, the automated measurement sequence in the software was modified to make it “even more automatic”, which, in turn, greatly reduces potential sources of errors. These changes improve measurement accuracy and repeatability even further. The changes are encompassed, for the most part, in a new button named “Run M2 Setup”. It is meant to be used only once, and works as follows: basically, the system begins with a quick scan of the beam caustic, just to find where the beam waist and the Rayleigh ranges are located. After this, the system automatically goes at the position of the beam waist, and begins the background subtraction process there. Then, this is when the only non-automatic step happens: the user needs to block the laser (and unblock it shortly after) when prompted. Finally, once this is all done, the system is now optimized, and you can now focus on making M2 scans.
Laser output measurement solves numerous problems for organizations across all industries. Download the guide below. Gentec-EO's high-accuracy laser beam measurement instruments help engineers, scientists and technicians in all sorts of laser applications from the factory to the hospital, laboratory and research center. Learn about our solutions for these measurement types:
So, what’s different here? Most importantly, it’s that the background subtraction is done automatically, and optimized by doing it at the position of the beam waist. It might sound like just a detail, but after analyzing many data sets sent by our customers, we realized that the background subtraction was often improperly made, but then again, it’s not like it was easy to carry out by yourself all of the steps described above. Therefore, it made more sense to automate this part, which is how you (and also, us) can rest assured that you will be consistently making M2 scans in the best conditions.
Note also that tab with the M2 controls (which include the new “Run M2 Setup” button) was updated to be easier to use, and make more sense.
Make sure to check out the new BEAMAGE-M2 user manual to learn more!
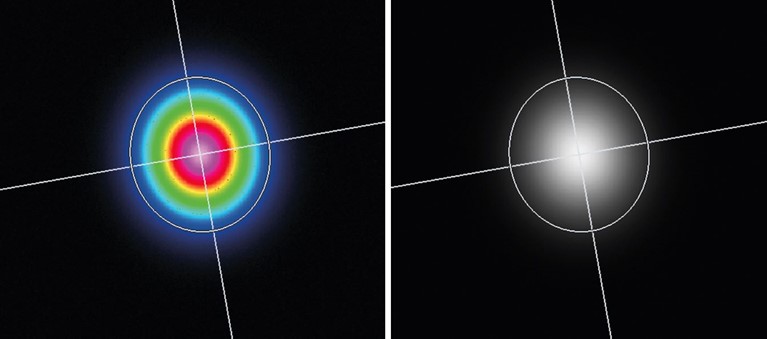
By popular demand, we have added the option to display beam profiles in the software in a grayscale format.
This function can be used at any time, may it be while streaming live images from the camera, or when you open an already-saved image, etc. It does what it says: all images will appear in varying tones of gray while this function is active, instead of the usual false-color scheme that is used by the software by default (i.e. the “rainbow” of colors).
The grays are defined in a simple, linear fashion: if a pixel is completely saturated, it will appear as white (RGB 255, 255, 255). If the pixel has absolutely no light (and no noise) coming in it, it will appear as pitch black (RGB 0, 0, 0). Therefore, a pixel at 50% of the saturation level will appear as a shade of gray that is 50% white and 50% black: you get the idea.
Some users prefer other colors. Feel free to contact us if you’d like to have another color scheme, and we will definitely consider it for future development, or possibly even customize the software for you!
Saving 2D images in BMP or JPEG format in the software has been improved, so that images generated this way are now an accurate representation of the image as it was captured by the sensor (and therefore, as it appeared in the 2D display panel in the software). In previous versions, images saved this way were of lower resolution than expected, or trimmed improperly.
These 2D images are now taken straight from the camera buffer, which simply means that there is absolutely no resolution loss, and every pixel appearing in the image represents exactly the pixels of the sensor. This is going to be useful for users that like to process and analyze the images in another software: you can now rest assured that no data is lost between the raw pixel data, and the image file itself.
Laser output measurement solves numerous problems for organizations across all industries. Download the guide below. Gentec-EO's high-accuracy laser beam measurement instruments help engineers, scientists and technicians in all sorts of laser applications from the factory to the hospital, laboratory and research center. Learn about our solutions for these measurement types:
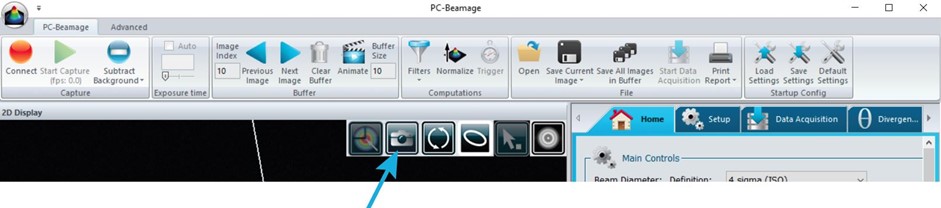
The keyboard binds for zooming in and zooming out on the images were modified so that they are now CTRL + (+) and CTRL + (-), instead of just (+) and (-). This was done in response to some reports from our customers that they were unable to zoom in/zoom out, or type the (+) and (-) symbols to some data fields in the software. CTRL + (+) and CTRL + (-) is also more standard: that’s how it works on modern web browsers, for instance (I could imagine some of you just learned something here, and are trying it out with this web page!)
You can also move the image up, down, left or right with CTRL + (arrows) now (no, this won’t work on your web browser though).
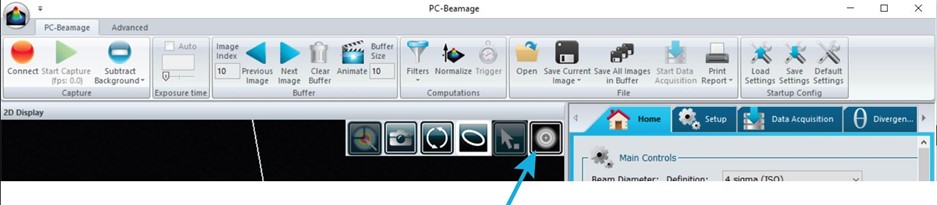
The “Subtract Background” button, which controls background subtraction, has also been improved so that it toggles on only when the background subtraction process is truly finished. In other words, you can unblock your laser when the button becomes orange, which is when the process is complete. Previously, the button would toggle when you clicked it, which didn’t make sense because you still have a few steps to do before background subtraction is applied.
This one was not actually added in V1.07.00, but instead in the previous version, V1.06.22. We still want to mention it because it might have gone under the radar and it’s important to know about it.
You may notice, as you use the new software, that your beam width measurements appear in red when “Subtract Background” button is inactive, and that a button saying “About background subtraction” appears next to them. This is a visual indicator to remind you that you should not be making measurements without first making a proper background subtraction. This feature is absolutely critical to ensure that you get the correct measurements: without it, the images you would capture are the sum of your laser, plus the ambient light coming from the environment around it. The measurements are therefore shown in red to indicate that you can’t really rely on them until you remove the noise from the image, which is what “Subtract Background” does.
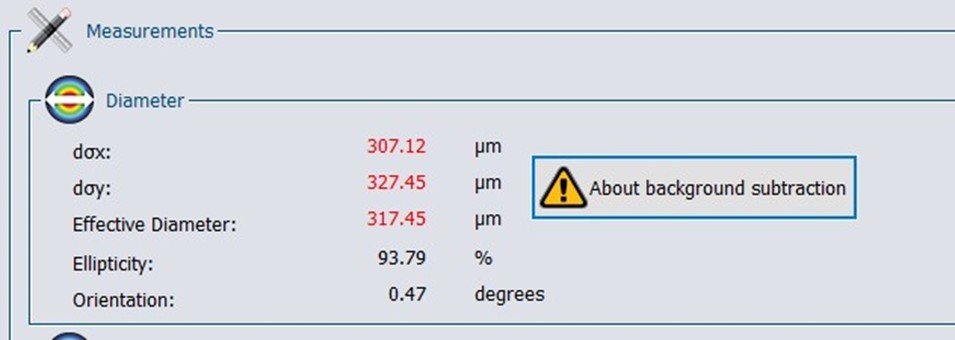
We saw too many cases where customers would send us their BEAMAGE files, and we could see that “Subtract Background” was not toggled on. Just to be put more emphasis: there are no circumstances in which you would be making “serious” measurements without first toggling on Subtract Background.
These are the main improvements that you need to know about for PC-BEAMAGE V1.07.00. There are also many other under-the-hood improvements that go beyond the scope of this blog post, like bug fixes, inconsistencies in certain parts of the interface, typos, etc. Please do not hesitate to contact us if you have any question, and also if you'd like to share your opinion on how you think the software could be improved further: we always love to hear from you!