How to measure laser power accurately in 7 simple steps
Tuesday, July 17, 2018
Tuesday, July 17, 2018
Are you wondering how to get the most accurate measurements possible from your laser power meter? Or, maybe are you looking for simple step-by-step instructions on how to make a power measurement the same way a laser expert would?
Wonder no more! This quick guide is here to tell you exactly how to measure laser power accurately using your Gentec-EO thermal laser power meter. Follow the steps below. If you have a photodiode detector instead, worry not: we’ll have another blog post on this subject.
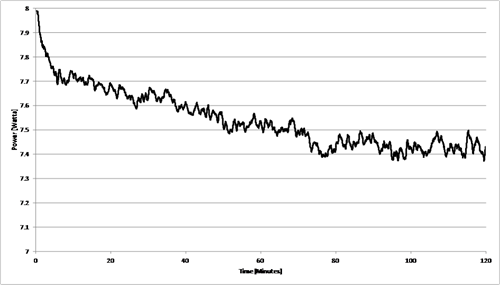
You need to wait until your laser reaches a stable point before measuring its power. This typically takes between 20 and 30 minutes. Why do we do this? The properties of the optical components tend to change over time as the laser reaches equilibrium with its environment, and for this reason, you should not use the laser before that point.
As you can see in the image below the power output decrease naturally. This might explain why two detectors tested one after another got a different reading.
You can’t just use any laser power detector with any laser. Every detector has its own set of specifications and you must use one that fits your laser specifications the best if you want an accurate measurement. The most common specifications include: average power, power density, energy, energy density, repetition rate, etc.
The simplest way to validate your laser power detector choice is to use our product finder tool. Alternatively, you can contact your Gentec-EO representative as we are always glad to help.
If you want to go solo, then jump to next point: you will want to play safe and expand your beam though!
Ensure you purchase the most optimal solution for your measurement needs with this checklist. Download it now, it's helpful and free!Buyer's checklist for laser power & energy meters

This is the best way to ensure the heat is completely absorbed and transferred to the power meter. The sensing element behind the absorber is large and symmetrical, so use all that aperture area! A beam that is too small increases the probability that the detector will be damaged during the measurement process.
Refer to this graph if you have doubts:
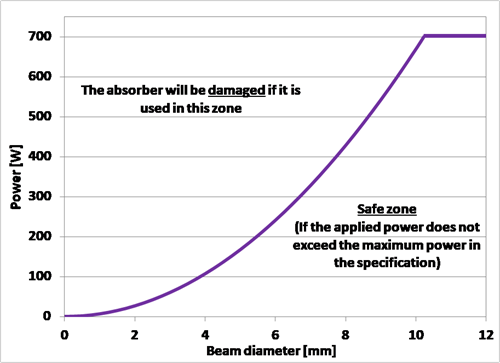
The graph above applies only for H-type absorber; please refer to the user manual for more detail on other absorbers.
By keeping in mind that we measure the heat transfer here (for power detectors), you can imagine that having the detector not at the same temperature as the ambient conditions will affect the measurement negatively. In other words, the power detector transfers heat all the time, even more so when the head is at a different temperature than the surrounding environment.
Best way to solve this issue is to heat it up. Two minutes are more than enough for the detector to heat up.
Laserist hint: for smaller power heads with a maximum average power such as 30 W, you can do this step in one minute.
Blocking the laser beam will let the head reach temperature equilibrium. The thermal disc will transfer heat to its casing, or with the fan on or with the water cooling at a normal natural rate now. At the same rate it would transfer heat when exposed to laser. Two minutes should be enough or one minute for head that can take 30 W or less.
Laserist hint: if the power meter came with a stand there’s a good reason for it. If it comes with no water or fan cooling, you still need space around the detector to allow air to freely flow and cool down the device by convection.
If you use a fan-cooled head, you’ll want some space behind the detector so air can flow.
Using the zeroing function on your monitor will define what is the zero level for you. This happens, of course, when the laser is not currently in operation and the environment is thermally stable.
Here are two good points to note here:
This takes a lot less time for a detector with anticipation turned on where we can get an accurate measurement in 1 second for smaller detectors such as the UP19K-15S-H5-D0. Anticipation is a tuning done in the electronics of the detector to predict the future measurement value: it is reliable in most circumstances and drastically speeds up the rise time of the device.
We recommend you to wait at least 1 minute since we know that after one minute the power will remain stable. If you want to do the same as we do here at Gentec-EO, then know this: when we perform a calibration for your power meter, we can wait up to 12 minutes under laser before we seal the deal.
To increase stability, you can set a moving average period of 5 seconds to improve the performance of tests such as long time burn-in.
A fairly common mistake we see is in regards to the wavelength correction factor, and how to use it at different wavelengths than 1064 nm. Keep in mind that the detector has a NIST-traceable sensitivity value valid for a 1064 nm laser. If your laser is somewhere else in the calibrated spectral range of the detector, but not at 1064 nm, a personal wavelength correction factor has been saved in the detector’s memory chip and must be taken into account when doing such measurements. When you use a Gentec-EO monitor along the detector, selecting the operating wavelength of the laser in the interface will do the process for you.
Another step that is always useful to ensure the zeroing process was done properly. The room temperature could have risen when the laser warmed up. The measurements should be similar from one to another. The repeatability of our power meters is ±0.5%, so any difference from one measurement session to another that is higher than this should prompt a verification on your end. Is the laser really stable over time too?
That’s it! Now you know how to measure laser power like an expert in just a few simple steps. Should you have more questions, do not hesitate to contact a Gentec-EO representative or to get in touch with our customer support.